Create a React-based app with ASP.NET Minimal APIs and MongoDB storage
I’ve been using React for while by mixing it up with .NET stuff and enjoying it a lot. For this post, I decided to combine them along with Docker Compose, ASP.NET Minimal APIs and MongoDB support!
Using React
I use React the tech behind my blog (mostly NodeJS/Jamstack client-side generated which I migrated recently from existing code that has been around ~2015) both for the client and server side rendering.
So this time I decided to set a sample to combine React and .NET in a sample app and ended-up packing it as Pull-Request #248 for the Awesome-Compose repo from Docker in GitHub, following same structure I did for previous .NET contributions into that repo.
If you are interested in previous posts about Awesome-Compose, either curious about Docker-izing .NET 5/6 apps or using GitHub Codespaces for development you can browse them from here and here.
The code for this post is also available from my GitHub under this repo:
https://github.com/stvansolano/codebox-react-dotnet-mongodb
So, let’s get started! A few things you may need to install:
- Docker Compose
- .NET 6 SDK
- NodeJS
Side-note: I didn’t really have to install anything while developing this on my local as I was using GitHub Codespaces with my some tailored devcontainer setup, so I can focus on development!

1) Creating the /frontend: A simple TODO app.
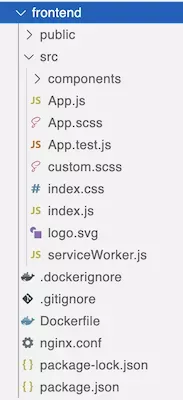
For this sample, we will use react-scripts scaffold for creating a basic app and use a very simple, still classic sample for having a TODO app in order to focus on JavaScript, NodeJS/Npx stuff. For this sample, I also re-used pretty much of the React sample from Awesome-Compose repo, which is fairly common and straightforward:

In order to consume our API later from ASP.NET, let’s add a NGINX file for taking care of the API calls later from our ASP.NET Web API. Things will run on their own NGINX-based container so the backend is de-coupled from the frontend.
server {
    listen       80;
    server_name  localhost;

    server_tokens off;
    proxy_hide_header X-Powered-By;
    proxy_hide_header Server;
    add_header X-XSS-Protection "1; mode=block";
    add_header Strict-Transport-Security 'max-age=31536000; includeSubDomains; preload';
    add_header X-Frame-Options DENY;
    add_header X-Content-Type-Options nosniff;
    add_header X-Permitted-Cross-Domain-Policies master-only;
    add_header Referrer-Policy same-origin;
    add_header Expect-CT 'max-age=60';

    location / {
        root   /usr/share/nginx/html;
        index  index.html index.htm;
        try_files $uri $uri/ /index.html;
    }

    location /api {
        proxy_set_header  Host $host;
        proxy_set_header  X-Real-IP $remote_addr;
        proxy_set_header  X-Forwarded-For $proxy_add_x_forwarded_for;
        proxy_set_header  X-Forwarded-Host $server_name;
        proxy_pass        http://backend:8000;
        proxy_redirect    default;
    }
}
Important: The .NET CLI and also Visual Studio provide a great set of pre-defined templates that also include React, Angular and more great stuff, which I encourage to give it a try. Also, pretty much of this tutorial can be also take .NET on the frontend, with the help of amazing Blazor 💖✨
2) Now it’s time for .NET in the /backend: Set up Minimal API for MongoDB
Here things become more interesting. By scaffolding a new Web API from .NET 6, we can implement a very-simple, still small program to call MongoDB collection and support some basic operations for our API, and we can add Swagger+OpenAPI support with a few lines of code:
using System;
using System.Linq;
using System.Threading.Tasks;
using MongoDB.Bson;
using MongoDB.Bson.Serialization.Attributes;
using MongoDB.Driver;
using Models;
using Swashbuckle.AspNetCore.SwaggerGen;

var builder = WebApplication.CreateBuilder(args);

// Learn more about configuring Swagger/OpenAPI at https://aka.ms/aspnetcore/swashbuckle
builder.Services.AddEndpointsApiExplorer();
builder.Services.AddSwaggerGen();

string connectionString = builder.Configuration.GetConnectionString("DocumentDbConnection");
string databaseName = builder.Configuration.GetConnectionString("DocumentDbName") ?? "BackendMongoDb";
string collectionName = builder.Configuration.GetConnectionString("DocumentCollectionName") ?? "ToDos";

builder.Services.AddTransient<MongoClient>((_provider) => new MongoClient(connectionString));

var app = builder.Build();

var isSwaggerEnabledFromConfig = bool.TrueString.Equals(builder.Configuration["EnableSwagger"] ?? "", StringComparison.OrdinalIgnoreCase);
if (isSwaggerEnabledFromConfig)
{
    Console.WriteLine("Swagger enabled via appsettings.json");
}

// Configure the HTTP request pipeline.
if (app.Environment.IsDevelopment() || isSwaggerEnabledFromConfig)
{
    app.UseSwagger();
    app.UseSwaggerUI();
}

app.MapGet("/api/todos", async (MongoClient connection) =>
{
    try
    {
        var database = connection.GetDatabase(databaseName);
        var collection = database.GetCollection<ToDo>(collectionName);
        var results = await collection.Find(_ => true).ToListAsync().ConfigureAwait(false);

        return Results.Ok(results);
    }
    catch (Exception ex)
    {
        return Results.Problem(detail: ex.ToString());
    }
});

app.MapGet("/api/todos/{id}", async (string id, MongoClient connection) =>
{
    try
    {
        var database = connection.GetDatabase(databaseName);
        var collection = database.GetCollection<ToDo>(collectionName);
        var result = await collection.FindAsync(record => record.Id == id).ConfigureAwait(false) as ToDo;

        if (result is null)
        {
            return Results.NotFound();
        }

        return Results.Created($"/todoitems/{result.Id}", result);
    }
    catch (Exception ex)
    {
        return Results.Problem(detail: ex.ToString());
    }
});

app.MapPost("/api/todos", async (ToDo record, MongoClient connection) =>
{
    try
    {
        var database = connection.GetDatabase(databaseName);
        var collection = database.GetCollection<ToDo>(collectionName);
        await collection.InsertOneAsync(record).ConfigureAwait(false);

        return Results.Created($"/api/todos/{record.Id}", record);
    }
    catch (Exception ex)
    {
        return Results.Problem(detail: ex.ToString());
    }
});

app.Run();
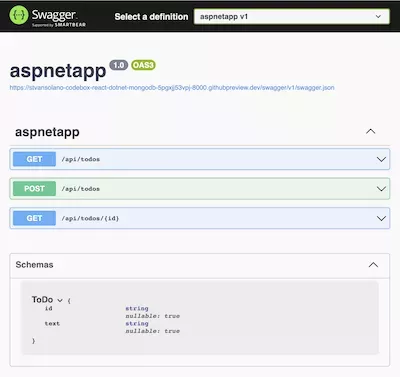
Here is a screenshot of the backend when opening the /swagger endpoint:

3) Oh! Yes, MongoDB. Let’s Compose it and wrap up with .NET!
Last but not least, let’s have the Frontend in place, connect it to the Backend and store our To-Dos in MongoDB.
We can use Compose services here by just grabbing the container images and set things up.
 services:
  frontend:
    build:
      context: frontend
    ports:
      - 80:80
    volumes:
      - '.:/app'
      - '/app/node_modules'
    networks:
      - react-frontend
    depends_on:
      - backend
    links:
      - backend

  backend:
    build: backend
    restart: always
    ports:
      - 8000:8000
    depends_on:
      - mongo
    links:
      - mongo
    environment:
      - ASPNETCORE_URLS=http://+:8000
      - EnableSwagger=true
    networks:
      - react-backend
      - react-frontend

  mongo:
    restart: always
    image: mongo:4.2.0
    volumes:
      - ./data:/data/db
    networks:
      - react-backend

  mongo-express:
    image: mongo-express
    restart: always
    ports:
      - 8081:8081
    environment:
      ME_CONFIG_MONGODB_ADMINUSERNAME: root
      ME_CONFIG_MONGODB_ADMINPASSWORD: example
    depends_on:
      - mongo
    links:
      - mongo
    networks:
      - react-backend

networks:
  react-backend: {}
  react-frontend: {}
The compose file also includes a Mongo-Express server in the Compose file so we can quickly explore the NoSQL documents and check everything end-to-end from UI in React either Swagger document generated for us with .NET
Also, I added a EnableSwagger flag as a Environment variable, which can be read and set accordingly in case you wan to expose Swagger endpoint. To learn more about Appsettings.json, environment variables and overriding them for Docker containers you can follow this link:
Bonus tip: CosmosDB support out of the box!
We can take advantage of using Azure CosmosDB, which supports MongoDB connector so it’s pretty easy to set-up and swap from vanilla MongoDB to use CosmosDB. Here I include some links for reference along with more samples to follow-up:
- https://docs.microsoft.com/en-us/azure/cosmos-db/mongodb/connect-using-mongoose/
- https://docs.microsoft.com/en-us/azure/cosmos-db/mongodb/mongodb-introduction/
- https://devblogs.microsoft.com/cosmosdb/build-a-node-js-app-with-azure-cosmos-dbs-api-for-mongodb/
Happy coding!


